

There is something inherently joyful about a “mini” version of a classic. In professional pastry kitchens, we call these mignardises—the little bite-sized sweets served at the end of a long, multi-course meal. But before I was plating delicate treats in fine-dining spaces, I was in a sun-drenched kitchen in Savannah, learning that the secret to a perfect cookie isn’t just the quality of the chocolate; it’s the ratio of crispy edge to soft center.
I remember the first time I made these for a neighborhood bake sale. I had planned on standard-sized cookies, but a kitchen mishap with my measuring scoops forced me to go small. To my surprise, the mini versions sold out in ten minutes. Since then, whether I’m consulting for zero-waste cafes in Madrid or baking for my own family, these bite-sized gems are my go-to. They are the perfect little hit of nostalgia that fits right in the palm of your hand.
Why You’ll Love This
- The Perfect Ratio: Because they are small, you get a higher percentage of those golden, buttery “crisp” edges while maintaining a gooey, molten center.
- Portion Control (Or Not!): They are ideal for lunchboxes or party platters, and let’s be honest—eating five small cookies feels much more adventurous than eating one large one.
- Quick-Fire Baking: Due to their size, these bake in under 10 minutes. It’s the ultimate “emergency” dessert for when guests drop by unexpectedly.
- Kid-Approved (And Chef-Tested): Children love the “cute” factor, but the depth of flavor from the brown sugar and vanilla makes them a hit with the most discerning adults.
- Freezer-Friendly: You can freeze the tiny dough balls and pop just three or four into the toaster oven whenever the craving hits.
- Professional Texture: By using the creaming method correctly, you achieve a bakery-quality crumb that doesn’t crumble or go dry.
- Versatile Canvas: This dough is incredibly stable, making it the perfect base for everything from mini M&Ms to chopped pecans.
The Chef’s Expertise
Sofia’s Professional Secrets
In the world of professional baking, the difference between a “good” cookie and a “legendary” cookie comes down to temperature and aeration. Here is how I apply a chef’s mindset to these mini treats:
- The Creaming Window: Most people stop mixing the butter and sugar once they are combined. In a professional kitchen, we look for “light and fluffy.” This means beating the butter and sugars for at least 3 minutes. This process, called mechanical leavening, creates tiny air pockets that expand in the oven, giving your mini cookies a soft, cloud-like lift rather than a dense, heavy texture.
- The Flour “Fold”: Once you add the dry ingredients, the clock is ticking. Over-mixing at this stage develops gluten, which is great for bread but terrible for cookies. Mix until you see just a streak of white flour left, then stop and finish the job by folding in the chips by hand.
- The Mini Chip Advantage: Don’t be tempted to use standard-sized chips. In a mini cookie, a large chip acts like a structural anchor, preventing the dough from spreading correctly. Mini chips allow for “chocolate distribution,” ensuring every single millimeter of the cookie has a hit of cacao.
- The “Carry-Over” Cook: This is a professional term for food that continues to cook after being removed from the heat source. For a chewy center, remove the cookies when the edges are set but the centers still look slightly “wet” or under-baked. They will firm up on the hot pan as they cool.
Experience Troubleshooting
“I’ve been there” Moments
I remember one holiday season where I was baking five different types of cookies at once. I got distracted and let my butter get way too warm—it was practically oily. The result? My mini cookies turned into “pancakes” that all ran together into one giant sheet.
If your cookies are spreading too much: I’ve been there! Usually, it’s because the butter was too soft or the oven wasn’t hot enough. My fix is simple: chill the dough. If your kitchen is warm, pop the scooped dough balls into the fridge for 20 minutes before they go into the oven. This “shocks” the butter, allowing the edges to set before the center melts completely.
The “Tough” Cookie: If your cookies come out hard like crackers, you likely over-measured the flour or over-mixed the dough. Always fluff your flour with a spoon before leveling it off in the measuring cup.
The “Burnt Bottom” Blues: Mini cookies are delicate. If you find your bottoms are browning too fast, try “double panning”—stacking one baking sheet on top of another. This creates an air pocket that insulates the bottom of the cookies from the direct heat of the oven floor.
Health Benefits
Here’s what this does for you:
- Mindful Indulgence: The mini size allows for built-in portion control, letting you satisfy a sweet tooth without a massive sugar spike.
- Iron & Minerals: Darker mini chocolate chips contain small amounts of iron and magnesium, which are essential for oxygen transport and muscle function.
- Mood Boost: It’s scientifically proven—chocolate stimulates the release of endorphins and serotonin, the “feel-good” chemicals in the brain.
- Vanilla Aromatherapy: The scent of pure vanilla extract has been shown in studies to reduce anxiety and promote a sense of calm during the baking process.
Ingredients at a Glance
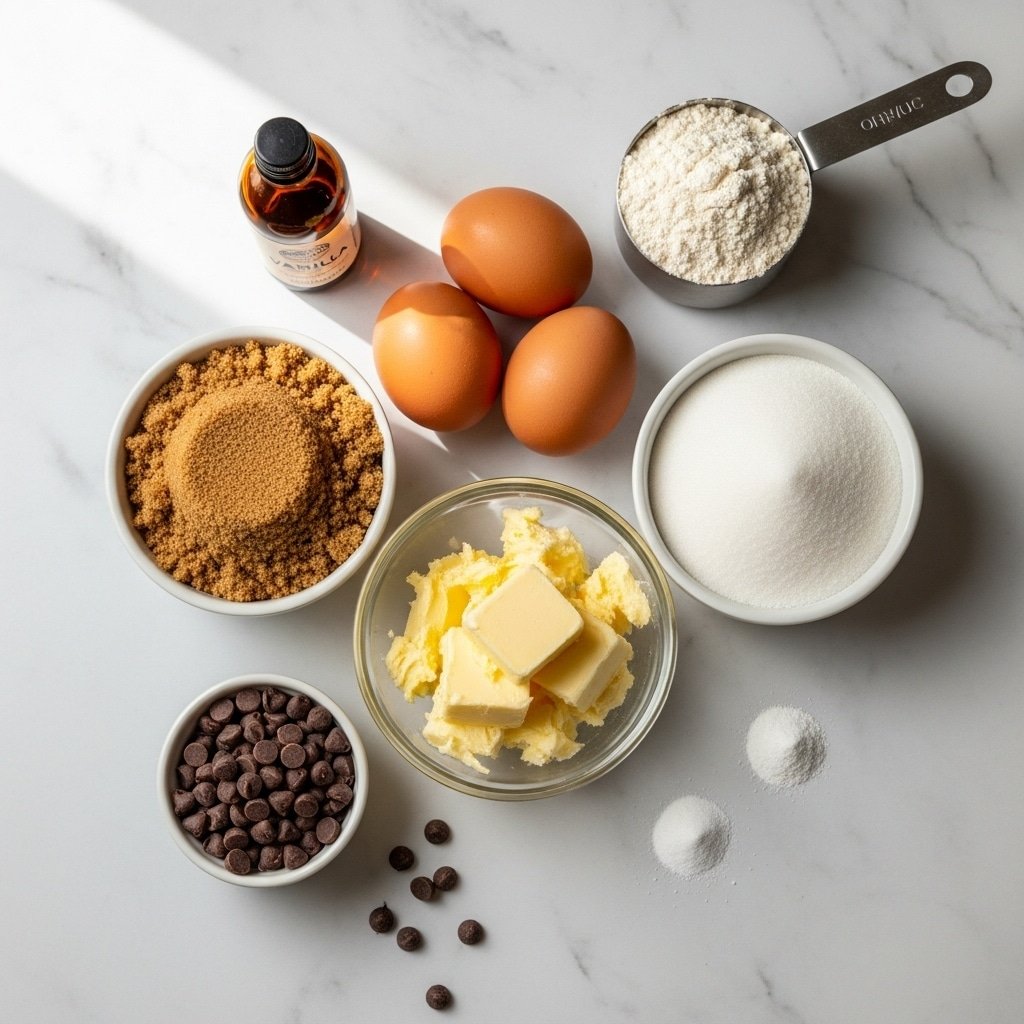
- 1 cup (2 sticks) Unsalted Butter: Softened to room temperature. Using unsalted allows us to control the seasoning precisely.
- ¾ cup Granulated Sugar: For those perfectly crisp, golden edges.
- ¾ cup Light Brown Sugar: Packed. This is where the chewiness and deep molasses notes come from.
- 2 Large Eggs: Ensure these are at room temperature so they emulsify properly with the butter.
- 2 teaspoons Pure Vanilla Extract: Don’t use the imitation stuff; the flavor difference in a cookie this small is massive.
- 2 ¼ cups All-Purpose Flour: This provides the structural skeleton of the cookie.
- 1 teaspoon Baking Soda: Our chemical leavener for rise and browning.
- 1 teaspoon Salt: Essential to balance the sugar and make the chocolate flavor pop.
- 2 cups Mini Chocolate Chips: These are non-negotiable for the perfect “mini” experience.
Step by Step: The Process
- Preheat and Prep: Set your oven to 350°F. Line your sheets with parchment paper. This isn’t just for cleanup; it provides a neutral surface for the cookies to spread evenly.
- The Creaming Method: Beat the softened butter and both sugars until the mixture looks pale and has a texture like damp sand.
- The Emulsion: Add the eggs one at a time, followed by the vanilla. The batter should look smooth and glossy.
- Dry Integration: Whisk your flour, soda, and salt. Gradually add this to the wet mix on the lowest speed.
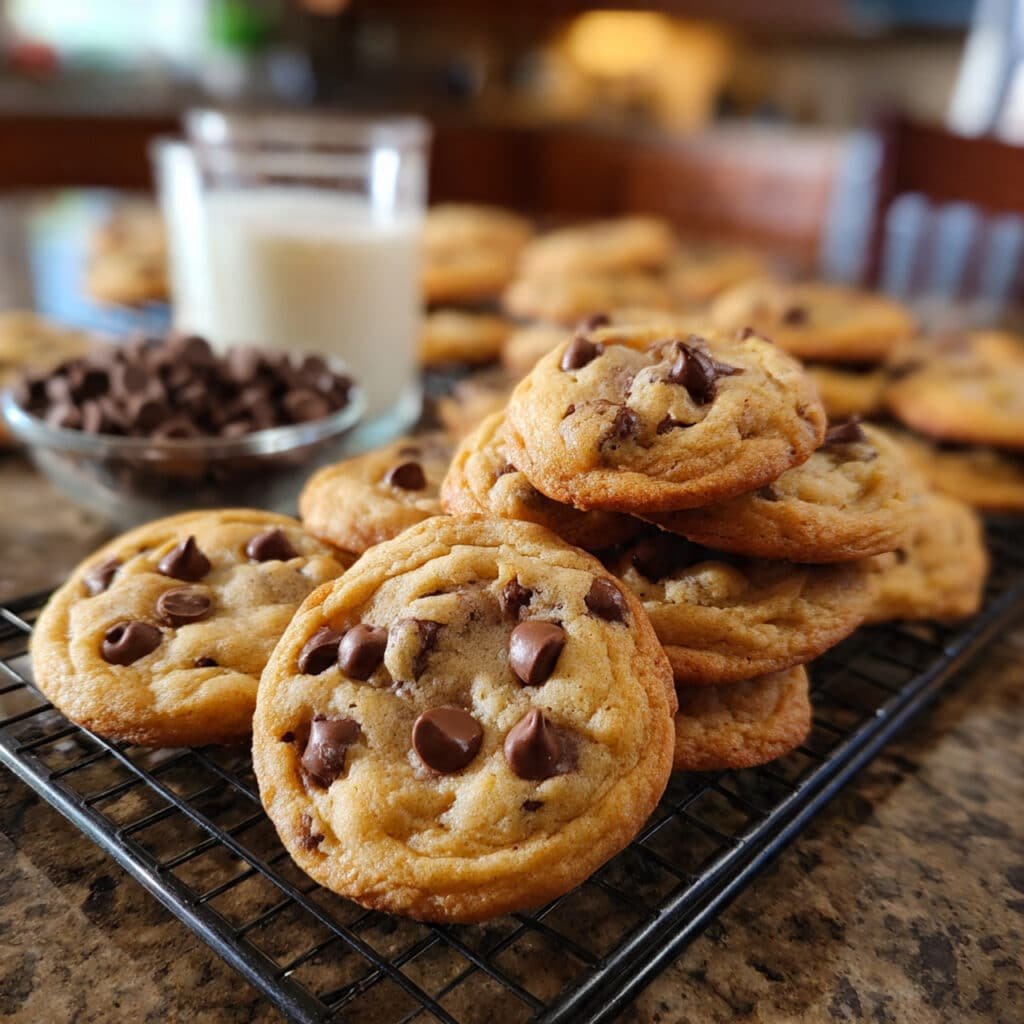
- The “Single Bite” Moment: Fold in your mini chips. This is the stage I love to photograph: A hand holds a spoon, lifting a single bite of the raw, chip-studded dough towards the camera, slow-motion, to clearly showcase its texture and detail. 6. Shape and Bake: Use a small scoop to drop tablespoon-sized balls onto the sheet. Space them 1.5 inches apart. Bake for 8–10 minutes.
- The Set: Let them sit on the hot pan for 2 minutes before moving them to a cooling rack. This allows the structure to “lock” in place.
Ways to Switch It Up
- The “Madrid” Salted Cookie: Sprinkle a tiny pinch of Malden sea salt on top of each cookie immediately after they come out of the oven. The contrast with the sweet chocolate is sophisticated and addictive.
- Zero-waste hack: If you have a few tablespoons of leftover coffee, add a teaspoon of instant espresso powder to the dough. It deepens the chocolate flavor without making the cookies taste like coffee.
- The “Party Mix”: Swap half the chocolate chips for mini M&Ms or toffee bits for a colorful, crunchy variation.
- When I’m broke: You can substitute half the butter with shortening. The cookies will be slightly less flavorful but will have an incredible, pillowy soft texture.
Keeping It Fresh
Mini cookies are best enjoyed within the first 48 hours, but they will stay soft for up to 5 days if stored in an airtight container with a slice of white bread (the cookies will absorb the moisture from the bread).
If you want that “just-baked” experience a few days later, pop a few cookies in the microwave for exactly 8 seconds. This re-melts the cocoa butter in the chips and softens the crumb, making them taste like they just came out of the Savannah sun.
SAVE THIS ONE
Pin this recipe to your “Baking Favorites” board! It’s the only chocolate chip cookie recipe you’ll ever need for parties, gifts, or late-night snacks.
Stuff People Ask Me
- People ask: Why are my cookies flat?
- Sofia’s Answer: Usually, this means the butter was too warm or you over-creamed it to the point of melting. Try chilling the dough balls for 30 minutes before baking to help them hold their shape.
- Q: Can I use regular chocolate chips?
- A: You can, but regular chips are often too large for this dough-to-chip ratio. If you must use them, give them a rough chop first so they integrate better.
- People ask: Can I freeze the dough?
- Sofia’s Answer: Yes! This is my favorite “pro” tip. Freeze the balls on a tray, then move them to a bag. You can bake them straight from the freezer—just add 2 minutes to the bake time.
- Q: How do I keep them soft?
- A: The brown sugar helps, but the airtight container is key. Don’t leave them out on a plate overnight or they will turn into rocks!
One More Thing
Baking is a science, but it’s also an art of the senses. Pay attention to the smell of your kitchen—when you start to smell the butter and toasted sugar, that’s your sign that the cookies are almost ready, regardless of what the timer says.
Enjoy every little bite, Sofia

Mini Chocolate Chip Cookies
Ingredients
Equipment
Method
- Preheat your oven to 350°F (175°C) and line two baking sheets with parchment paper or silicone mats.
- In a large bowl, cream the softened butter, granulated sugar, and brown sugar on medium-high speed for at least 3 minutes. This mechanical leavening creates the necessary air pockets for a soft texture.
- Add the eggs one at a time, beating well after each addition to ensure proper emulsification. Stir in the vanilla extract.
- In a separate bowl, whisk the flour, baking soda, and salt. Gradually add to the wet ingredients, mixing on low speed only until a few streaks of flour remain.
- Gently fold in the mini chocolate chips by hand to avoid over-developing the gluten.
- Scoop rounded tablespoons of dough onto the prepared sheets, about 1.5 inches apart. Bake for 8-10 minutes until edges are golden but centers look slightly under-baked.
- Allow cookies to rest on the hot baking sheet for 2 minutes (carry-over cooking) before transferring to a wire rack.